How To Install macOS Sequoia on UTM?
Running macOS Sequoia on a virtual machine is a smart move for those who want to try the latest macOS version without risking their primary system. Virtualization allows you to run different operating systems on your Mac, offering a safe environment for testing new software, experimenting with configurations, and much more without affecting primary system. And here in this guide, I’ll walk you through to install macOS Sequoia on a virtual machine using UTM.
Why Use UTM for Virtualization?
UTM is a powerful, free virtualization tool that makes running different OS on your Mac seamless and straightforward. Unlike other virtualization software, UTM is designed to integrate with macOS, providing better compatibility and performance. So, let’s try out macOS Sequoia and check what UTM could offer too.
What You’ll Need to Get Started?
Before diving into the installation process, it’s crucial to ensure you have everything prepared:
1. Apple Silicon Mac: Ensure your Mac has at least 60 GB of disk space and 16 GB of RAM. This will provide the necessary resources for running macOS Sequoia smoothly in a virtual environment.
2. macOS Sequoia IPSW File: You’ll need to download the IPSW file for macOS Sequoia from Apple. This file contains the necessary data for installing the macOS. Also, Download macOS 15(Sequoia) for VirtualBox & VMware
3. UTM Application: Download and install UTM from its official website. This application is the core tool you’ll use to create and manage your virtual machine.
4. Xcode 16: Download the Xcode 16 from Apple’s Developer Tools page. Xcode is essential for certain macOS development environments and will help ensure compatibility with macOS Sequoia.
If you have no access to Xcode 16 or macOS Sequoia then you are recommended to run macOS on VMware or VirtualBox. This way, you can easily do the installation without creating any developer account or things similar.
Step-by-Step Guide to Install macOS Sequoia on UTM

Now that you have everything ready, let’s walk through the steps to get macOS Sequoia up and running on your virtual machine.
Step 1: Create a New Virtual Machine
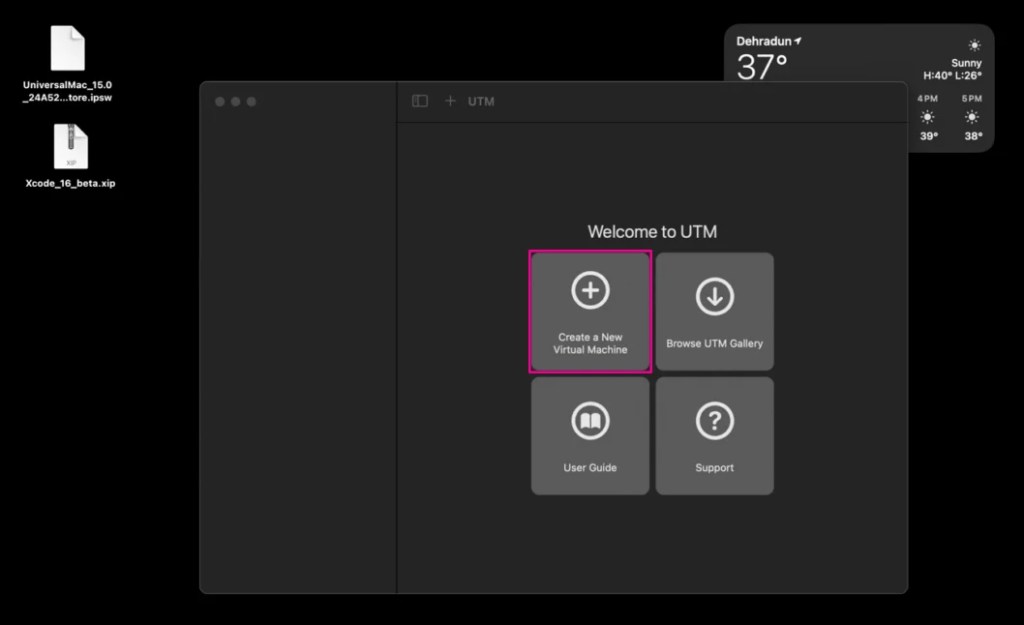
Start by opening UTM on your Mac. Click on Create a New Virtual Machine and then select Virtualize. This will allow you to set up a new virtual machine specifically for macOS.
Step 2: Configure Your Virtual Machine

Choose macOS 12+ when prompted. This option is designed for newer macOS versions, ensuring that Sequoia runs as intended. Next, click Browse and select the macOS Sequoia IPSW file you downloaded earlier. This file is crucial for the installation process.
Step 3: Allocate Hardware Resources

The performance of your virtual machine depends on the resources you allocate to it. For optimal performance, it’s recommended to assign at least 8GB of RAM, 4 CPU cores, and 80 GB of disk space. These settings can be adjusted based on your Mac’s capabilities, but sticking to these recommendations will provide a smoother experience.
Step 4: Name and Save Your Virtual Machine
Choose a name for your virtual machine that makes it easily identifiable, especially if you plan on running multiple virtual machines. Once named, click Save, and you’ll see the Start button appear in the UTM application.
Step 5: Begin the Installation Process
Click Start to begin the installation of macOS Sequoia. The process may take some time, depending on your system’s specifications. During this time, UTM will set up the virtual environment and install macOS Sequoia.
Step 6: Complete the Initial Setup
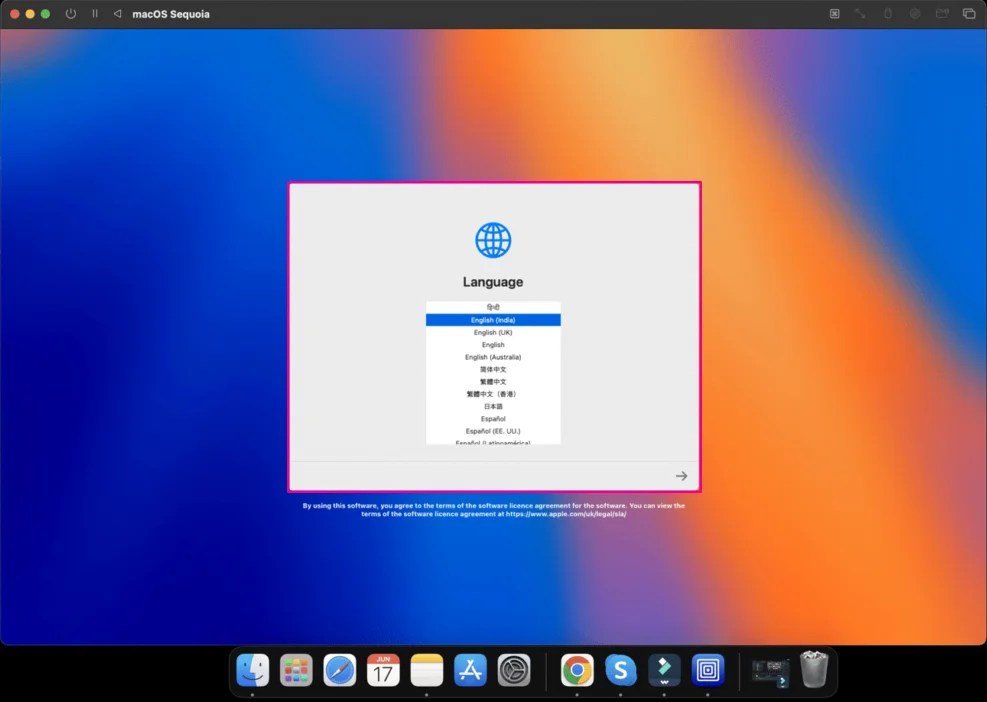
Once the installation is complete, you’ll be greeted with the macOS Sequoia Welcome screen. Follow the on-screen prompts to complete the basic setup, such as selecting your language, country, and creating a new user account. This step is similar to setting up a new Mac.
Troubleshooting Common Issues
While the process is generally smooth, you may encounter some common issues:
Slow Performance: If you notice sluggish performance, consider increasing the allocated RAM or CPU cores for your virtual machine. Also, ensure that no other heavy applications are running on your Mac during the installation.
Installation Stuck: If the installation process gets stuck, restart UTM and try again. Ensure that your IPSW file isn’t corrupted and that you have sufficient disk space.
Compatibility Issues: If macOS Sequoia doesn’t boot properly, it could be due to hardware limitations. Double-check your Mac’s specifications against the requirements.
By following this guide, you’ve successfully set up macOS Sequoia on UTM. Now you can explore the new features of macOS Sequoia without affecting your primary system. Also, keep UTM updated for the best performance, and stay informed about any updates or patches from Apple to ensure your virtual macOS experience remains smooth and secure.
Enjoy exploring all that macOS Sequoia has to offer within your virtualized environment!
Related Topic: Download macOS Sequoia Full Installer.PKG
Related Topic: Download macOS Sequoia Wallpaper


